

Are you planning a party? Perhaps a birthday party, baby shower, bridal shower or something fun for the holidays like a cookie exchange or something to celebrate the season with your neighbors or book club. If you want to add a bit of fun then I highly recommend setting up a candy table. It's well worth the time and guaranteed to make any celebration extra special!
I am by no means as expert but I have done a few and wanted to share the steps so you can create your own. In addition I have called in an expert, Kristy Patterson from Sweet Nothings to give us the scoop!
If you are interested in seeing more, join Hampton Paper Designs at Girls Night Out sponsored by The Dandelion Patch as we will be featuring holiday candy tables. Dates are as follows:Oct 27, Leesburg, Nov 3rd Reston and Nov 10th , Vienna.
Here are some expert tips from Kristy:
Choose Theme and Colors:
Select a theme and choose 3-4 colors and table decor that supports your theme and try to match your candy selection to it.
Candy Selection:
Candy often coordinates with many occasions. Sometimes it's by color, other times it's by theme. Consider what your them is and try to coordinate your candy. Be it classic or vintage, traditional or unique chocolate or fruity, all candies offer some type of relationship to the theme. Another option is to stick with what you love - that always works too.
Dont Forget the Back Drop:
A backdrop of any type will help set the stage for your candy table. Fabric, window panes, outdoor settings, vintage hutches, or pie safes all offer great ways of making a backdrop. Don't be afraid to think outside the box when choosing your focal point. Something simple usually does the trick. If you think you backdrop looks a little plain, spice it up with bunting, paper lanterns, flowers or any items that coordinate with your theme.
Set Up 10 Easy Steps:
1. Identify Your Theme and Colors
My theme was back to school and my colors were red, orange and yellow which I pulled from the our school bus image.
2. Select Backdrop & Table Cloths
I tried to achieve balance and uniformity across the table. I used a 6 ft table and covered with jean fabric from Joanne's. I also used fabric as a backdrop from Joanne's. Its a bit tricky to get it flat and wrinkle free. A few other alternatives for the backdrop are wall paper, wrapping paper or fabric secured on a large painting canvas from Michael's.
3. Purchase Jars & Scoops
The 2 large jars on the side are from Pottery Barn that I purchased a few years ago. I like these as they give the table a bit of height. The jars with the silver lids are from Target. The small ones are around $4.99 and the large $6.99. Very inexpensive and can easily be used again. The round jar with the M&Ms is from Michael's. I think it was round 3-4.00. The lollipop holders are also from Michael's. I found them in the aisle with the wooden letters. They hold the lollipops perfectly! Another option is to use Styrofoam and cover with wrapping paper for the lollipops. The scoops are from Sur La Table. It took me a while to find these but it was worth it as they are such nice quality.I found a nice white serving tray from Bed Bath and Beyond for the Hershey Bars. Its the perfect width.
4. Create Labels
I used Hampton Paper Round stickers to identify the candy(place cards are also a great idea). I used a 3 inch round punch from Michael's on scrapbook paper to make the colored background for them. I purchased 7/8 inch gros grain ribbon from Michael's for the jars just to give it some texture. I created personalized labels for the Hershey Bars (25 for $75.00 from HPD) and used medium round stickers for the lollipops.
 5. Select Center Piece
 Here is a close up of the center of the table. It's nice to have something that compliments your theme in the middle. I choose a framed print for this table. For the firetruck party I hosted, Kristy from Sweet Nothings used her husband's fire hat. I also see a lot of people place the cake or cupcakes here. Also a great idea.
 Here is the left side of the table. I used books covered in brown paper to give the twizzlers and swedish fish some height. Another idea here is to wrap a few boxes in complimentary wrapping paper.
 Right side of the table. I added a ribbon to the scoops so they had some color that tied to the theme.

 Here is the left side of the table. I used books covered in brown paper to give the twizzlers and swedish fish some height. Another idea here is to wrap a few boxes in complimentary wrapping paper.
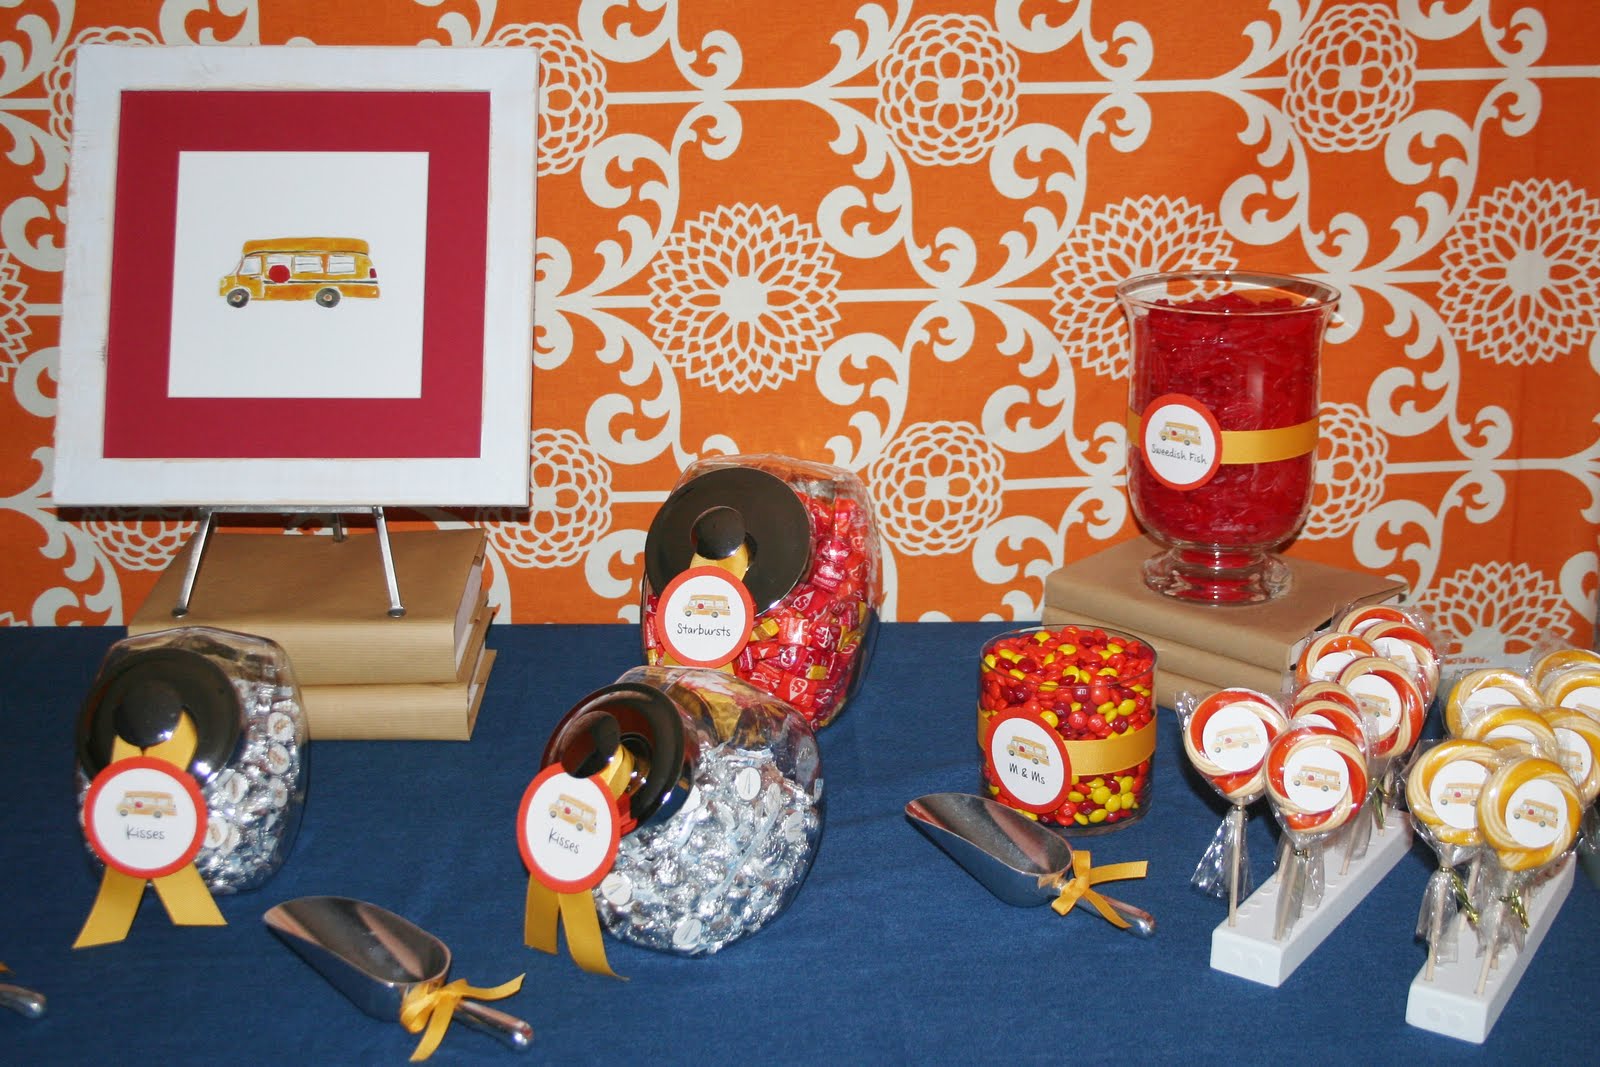 Right side of the table. I added a ribbon to the scoops so they had some color that tied to the theme.
6. Select Boxes or Bags for Candy
As far as containers for the candy - there are lots of fun options. For our BTS party, I used Chinese to go containers. They are 27 sq stickers and 27 boxes for $38.00 from HPD. Other great ideas are small colored bags or popcorn boxes from Michaels or boxes from The Container Store. Both places have a nice variety of colors and sizes. I recommend a label for the front to tie it to your theme.


7. Purchase Candy
Here is a close up of the candy jar from Target. I purchased a few bags of skittles and sorted to get the red, yellow and orange you see here. You can purchase bulk candy online that is already sorted at places like The Candy Warehouse. I found the candy from Target to be cheaper and didnt have to purchase in such large quantities. I tried to use the larger jars for the less expensive candy and the smaller ones for the more expensive which tends to be the chocolate.
 Again, I choose Starbursts for the large candy jar and weeded out the offensive colors that didn't coordinate with my theme!!
 It took two giant bags of M&Ms to yield this small jar of red, orange and yellow. Again, another reason to put the chocolate in small jars.
 I love the lollipops from Hammond's Candies. I added our medium stickers to tie them in with our theme. A ribbon on the bottom would also have been a nice touch. The lollipops were a nice way to add some add'l height to the table.

 Again, I choose Starbursts for the large candy jar and weeded out the offensive colors that didn't coordinate with my theme!!
 It took two giant bags of M&Ms to yield this small jar of red, orange and yellow. Again, another reason to put the chocolate in small jars.
  I love the lollipops from Hammond's Candies. I added our medium stickers to tie them in with our theme. A ribbon on the bottom would also have been a nice touch. The lollipops were a nice way to add some add'l height to the table.
I used 3 images, School Bus, Pencils and Pen and Pencil on Hershey kisses for the 3 small jars in the front of the table. Kiss stickers are 108 for $12.00
8. Give yourself plenty of time to sort the candy.
9. Assemble the Table
Now that you have everything you need, you are ready to assemble your table. It may take a few times to get everything organized the way you like so give yourself ample time to make adjustments.
10. Send Kristy and I photos of your finished table!


.jpg)

No comments:
Post a Comment